Материал: m083700e
36 • The WAGO-I/O-SYSTEM 750
Shielding (Screening)
2.9 Shielding (Screening)
2.9.1 General
The shielding of the data and signal conductors reduces electromagnetic interferences thereby increasing the signal quality. Measurement errors, data transmission errors and even disturbances caused by overvoltage can be avoided.
Attention
Constant shielding is absolutely required in order to ensure the technical specifications in terms of the measurement accuracy.
The data and signal conductors should be separated from all high-voltage cables.
The cable shield should be potential. With this, incoming disturbances can be easily diverted.
The shielding should be placed over the entrance of the cabinet or housing in order to already repel disturbances at the entrance.
2.9.2 Bus Conductors
The shielding of the bus conductor is described in the relevant assembly guideline of the bus system.
2.9.3 Signal Conductors
Bus modules for most analog signals along with many of the interface bus modules include a connection for the shield.
Note
For better shield performance, the shield should have previously been placed over a large area. The WAGO shield connection system is suggested for such an application.
This suggestion is especially applicable when the equipment can have even current or high impulse formed currents running through it (for example through atmospheric end loading).
WAGO-I/O-SYSTEM 750
CANopen
The WAGO-I/O-SYSTEM 750 • 37
Assembly Guidelines / Standards
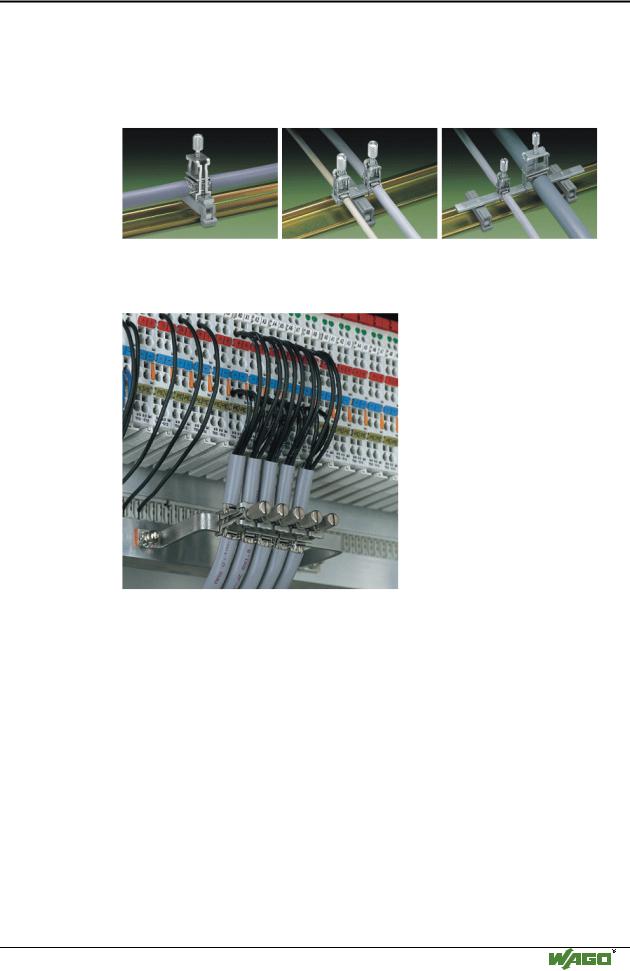
2.9.4 WAGO Shield (Screen) Connecting System
The WAGO Shield Connecting system includes a shield clamping saddle, a collection of rails and a variety of mounting feet. Together these allow many dfferent possibilities. See catalog W4 volume 3 chapter 10.
Fig. 2-25: WAGO Shield (Screen) Connecting System
p0xxx08x, p0xxx09x, and p0xxx10x
Fig. 2-26: Application of the WAGO Shield (Screen) Connecting System |
p0xxx11x |
2.10 Assembly Guidelines / Standards
DIN 60204, |
Electrical equipping of machines |
DIN EN 50178 |
Equipping of high-voltage systems with electronic |
|
components (replacement for VDE 0160) |
EN 60439 |
Low voltage – switch box combinations |
WAGO-I/O-SYSTEM 750
CANopen

38 • The WAGO-I/O-SYSTEM 750
Scope
2.11 Scope
This manual describes the field bus independent WAGO-I/O-SYSTEM 750 with the fieldbus controller for CANopen.
Item-No. |
Components |
750-837 |
Fieldbus Controller CANopen; 10 kBaud – 1 Mbaud; |
|
digital and analog signals; MCS Fieldbus connection |
750-837/020-000 |
Fieldbus Controller CANopen; 10 kBaud – 1 Mbaud; |
|
digital and analog signals; MCS Fieldbus connection, |
|
256 kB/192 kB PGM/RAM |
750-837/021-000 |
Fieldbus Controller CANopen; 10 kBaud – 1 Mbaud; |
|
digital and analog signals; MCS Fieldbus connection, |
|
640 kB/832 kB PGM/RAM |
750-838 |
Fieldbus Controller CANopen; 10 kBaud – 1 Mbaud; |
|
digital and analog signals; D-Sub Fieldbus connection |
750-838/020-000 |
Fieldbus Controller CANopen; 10 kBaud – 1 Mbaud; |
|
digital and analog signals; D-Sub Fieldbus connection, |
|
256 kB/192 kB PGM/RAM |
750-838/021-000 |
Fieldbus Controller CANopen; 10 kBaud – 1 Mbaud; |
|
digital and analog signals; D-Sub Fieldbus connection, |
|
640 kB/832 kB PGM/RAM |
2.12 Abbreviation
AI |
Analog Input |
AO |
Analog Output |
BC |
Buscoupler |
CAL |
CAN Application Layer |
CAN |
Controller Area Network |
COB ID |
Communication Object Identifier |
DI |
Digital Input |
DO |
Digital Output |
EMCY |
Emergency Objekt |
I/O |
Input/Output |
ID |
Identifier, Identification |
Idx |
Index |
M |
Master |
NMT |
Network Management |
PDO |
Process Data Object |
RO |
Read Only |
RTR |
Remote Transmit Request |
RxPDO |
Receive PDO |
RW |
Read/Write |
SDO |
Service Data Object |
S-Idx |
Sub-Index |
TxPDO |
Transmit PDO |
WAGO-I/O-SYSTEM 750
CANopen

Fieldbus Controller |
• 39 |
Fieldbus Controller 750-837, /02x-000, 750-838, /02x-000
3 Fieldbus Controller
3.1 Fieldbus Controller 750-837, /02x-000, 750-838, /02x-000
This chapter includes:
1.1.1 |
Description......................................................................................... |
40 |
1.1.2 |
Hardware ........................................................................................... |
42 |
1.1.2.1 |
View.............................................................................................. |
42 |
1.1.2.2 |
Variants......................................................................................... |
43 |
1.1.2.3 |
Device supply................................................................................ |
43 |
1.1.2.4 |
Fieldbus connection ...................................................................... |
44 |
1.1.2.5 |
Display elements........................................................................... |
45 |
1.1.2.6 |
Configuration and programming interface.................................... |
46 |
1.1.2.7 |
Operating mode switch ................................................................. |
46 |
1.1.2.8 |
Hardware address (Module ID) .................................................... |
47 |
1.1.2.9 |
Setting the baud rate ..................................................................... |
47 |
1.1.3 |
Operating system ............................................................................... |
49 |
1.1.3.1 |
Start-up.......................................................................................... |
49 |
1.1.3.2 |
PLC cycle...................................................................................... |
49 |
1.1.4 |
Process Image .................................................................................... |
51 |
1.1.4.1 |
General Structure .......................................................................... |
51 |
1.1.4.2 |
Fieldbus specific Process Data Architecture ................................ |
52 |
1.1.5 |
Data Exchange................................................................................... |
74 |
1.1.5.1 |
Communication objects ................................................................ |
74 |
1.1.5.2 |
Communication interfaces ............................................................ |
75 |
1.1.5.3 |
Memory areas................................................................................ |
75 |
1.1.5.4 |
Addressing .................................................................................... |
78 |
1.1.6 |
Programming the PFC with WAGO-I/O-PRO CAA ......................... |
90 |
1.1.6.1 |
WAGO-I/O-PRO CAA Library Elements for CANopen ............. |
90 |
1.1.6.2 |
IEC 61131-3 Program transfer...................................................... |
92 |
1.1.7 |
Starting up CANopen fieldbus nodes ................................................ |
95 |
1.1.7.1 |
Connecting the PC and fieldbus node........................................... |
95 |
1.1.7.2 |
Checking and setting the Baud rate .............................................. |
95 |
1.1.7.3 |
Setting the module ID ................................................................... |
96 |
1.1.7.4 |
Changing to the OPERATIONAL status...................................... |
97 |
1.1.7.5 |
Turning on the analog input data .................................................. |
97 |
1.1.7.6 |
Application specific mapping ....................................................... |
97 |
1.1.8 |
LED Display .................................................................................... |
101 |
1.1.8.1 |
Fieldbus status............................................................................. |
102 |
1.1.8.2 |
Node Status – Blink code from the 'I/O' LED ............................ |
103 |
1.1.8.3 |
Supply Voltage Status................................................................. |
109 |
1.1.9 |
Technical Data................................................................................. |
110 |
WAGO-I/O-SYSTEM 750
CANopen
40• Fieldbus Controller 750-837, /02x-000, 750-838, /02x-000 Description
3.1.1 Description
The fieldbus controllers for CANopen differ in the fieldbus connection, the appropriate variants in the size of the internal memory.
Item |
Fieldbus Connection |
750-837 |
|
750-837/020-000 |
MCS (Multi Connector System) |
750-837/021-000 |
|
750-838 |
|
750-838/020-000 |
D-SUB (9-pole) |
750-838/021-000 |
|
Item |
Memory Size |
750-837 |
PFC Memory: RAM 64 kB, FLASH: 64/128 kB *) |
750-837/020-000 |
PFC Memory: RAM 192 kB, FLASH: 128/256 kB *) |
750-837/021-000 |
PFC Memory: RAM 832 kB, FLASH: 320/640 kB *) |
750-838 |
PFC Memory: RAM 64 kB, FLASH: 64/128 kB *) |
750-838/020-000 |
PFC Memory: RAM 192 kB, FLASH: 128/256 kB *) |
750-838/021-000 |
PFC Memory: RAM 832 kB, FLASH: 320/640 kB *) |
*) with/without Online change
Attention
The executability and the support of the Gateway objects are ensured throught the versions starting from:
-HW 06 and SW 11 for 750-837, /020-000, /021-000,
-HW 01 and SW 11 for 750-838, /020-000, /021-000.
For Software versions starting from SW 11 the indicated hardware conditions are obligatory necessary. Likewise starting from the specified hardware versions SW 11 must be used at least.
Controllers 750-837 with a hardware version before HW 06 are executable only with a software till SW 10, thereby gateway objects are not supported.
Note
In this manual, the diagrams and pictures are shown from the controller 750-837. The descriptions also apply equally to the controllers 750-837/020- 000, /021-000, 750-838, /020-000, /021-000.
The programmable fieldbus controller (short: PFC) combines the CANopen functions of the fieldbus coupler with that of a programmable logic control (PLC).
The application program is created with WAGO-I/O-PRO CAA in accordance with IEC 61131-3.
All input signals of the sensors are grouped in the controller.
WAGO-I/O-SYSTEM 750
CANopen